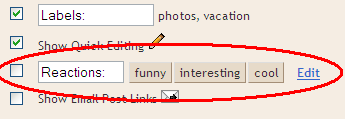
Configuration of reactions widget is very normal.In your default template you can perform this action from blog post options of page element.If change your template to your premium or free template then reactions widget cant be seen anymore.You have to put some code in your template.Lets see how to do this
1. Sign in to blogger dashboard
2. Click on the design tab and click ont the page elements
3. Click on the "edit" link under the blog posts
4. On the pop up window check the "Reactions" widget tand click save

5. Go to edit HTML page of your blog.
6. Check the "Expand widget templates"
7. Now find the following code
<data:post.body/>
8. Then after this line add the following code
<span class='reaction-buttons'><br /> <b:if cond='data:top.showReactions'><br /> <table border='0' cellpadding='0' width='100%'><tr> <td valign='center'><span class='reactions-label'><br /> <data:top.reactionsLabel/></span><br /> </td> <td><iframe allowtransparency='true' class='reactions-iframe' expr:src='data:post.reactionsUrl' frameborder='0' name='reactions' scrolling='no'/></td> </tr></table></b:if><br /> </span>
Save the updated template and Preview your blog


0 comments:
Click Here To add Comment